My first ever icinga plugin

Icinga2 is a Monitoring Application. Its main purpose is to monitor services of specified hosts. You either see the errors on the Webpage or you receive a small mail with the error message, if configured. Icinga provides plugins like ping, ssh, diskspace and many more for those monitoring tasks, but you can create plugins as well. Plugins can be scripts (Shell, Python, Perl, Ruby, PHP, etc.) or compiled binaries (C, C++, Go). I really was curious about writing my own icinga2 plugin and here it is. Mine is completely written in Shell and solely tested on my QNAP TS-212 NAS. Don’t hesitate to give it a shot on your QNAP NAS and share the results with me.
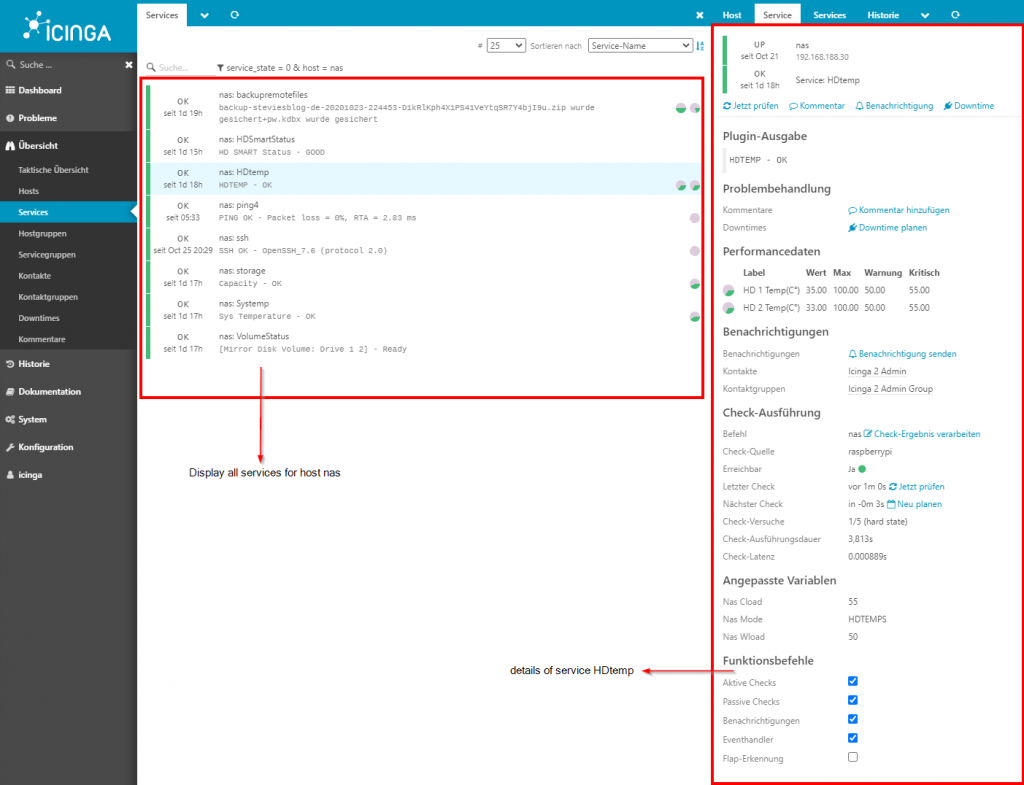
This is what my plugins output is on the webinterface. For now it contains a HDTemps, SysTemps, HDSmartStatus, HDCapacity and Volumestatus check. For each Hard drive, it will collect the temperature and the smart status. Were required you need to add a warning and critical threshold. To integrate this script to icinga you need to create a checkCommand object like this.

object CheckCommand "nas" {
  command = [ PluginDir + "/nas.sh"]
  arguments = {
   "-h" = {
        value = "$host.address$"
        description = "Hostname of the remote machine"
        }
   "-u" = {
        value = "$nas_username$"
        description = "Username for ssh Login"
        }
   "-w" = {
        value = "$nas_wload$"
        description = "Exit with WARNING Status if limit exceeds wload"
        }
   "-c" = {
        value = "$nas_cload$"
        description = "Exit with CRITICAL Status if limit exceeds wload"
        }
   "-m" = {
        value = "$nas_mode$"
        description = "mode for specific reports"
        }
   "-p" = {
        value = "$nas_port$"
        description = "ssh Port to connect to(default 22)"
        }
  }

  vars.nas_wload = 80
  vars.nas_cload = 95
}

80 is the default thresold for a warning message whilst 95 is the same for a critical message.

Service Object

For simplicity sake i applied those services to each host where host.vars.nas_username is set. For example my capacity check looks like this:

apply Service "storage" {
  import "generic-service"
  check_command = "nas"

  vars.nas_mode = "CAPACITY"
  vars.nas_wload = 80
  vars.nas_cload = 90
  assign where host.vars.nas_username != ""

}

With check_command = “nas” we call the previous defined CheckCommand Object with the same name. Nas_mode is always required to be set. You can see all available options by executing the script in the terminal.

pi@raspberrypi:/usr/lib/nagios/plugins $ ./nas.sh --help

nas, version 2020.10.19
 
Usage: ./nas.sh [OPTIONS]
Option  GNU long option         Meaning
------  --------------- -------
 
 -q     --help          Show this message
 -v     --version       Print version information and exit
 -h     --hostname      set hostname/IP     
 -u     --username      set username
 -p     --port          set Port default(22)
 -c     --critical      set critical value
 -w     --warning       set warning value
 -m     --mode          CAPACITY,BACKUP,VOLUME,SYSTEMP,HDTEMPS,HDDSTATUS

Find underneath my second example how i execute the hard drive temperature check:

apply Service "HDtemp" {
  import "generic-service"
  check_command = "nas"

  vars.nas_mode = "HDTEMPS"
  vars.nas_wload = 50
  vars.nas_cload = 55

 assign where host.vars.nas_username != ""
}

Host Object

My nas host does have the variable nas_username =”admin” so the services are linked with the host object.

object Host "nas" {
        import "generic-host"

        address = "192.168.188.30"
        check_command = "hostalive"
        vars["os"] = "Linux"
        version = 1596033350.202298
        zone = "raspberrypi"
        vars.nas_username = "admin"

        /* Define notification mail attributes for notification apply rules in `notifications.conf`. */
        vars.notification["mail"] = {
                /* The UserGroup `icingaadmins` is defined in `users.conf`. */
                groups = [ "icingaadmins" ]
        }

}

To retrieve all those Informations about my QNAP nas i use the internal command getsysinfo, so make sure it is available on your nas as well.

OK, you came down to here and did not see any peace of my code :).

It is available on my github repository, so check it out and follow the link 🙂
https://github.com/stevieWoW/NAS-QNAP-ICINGA2

My Scripts requires ssh access to the nas system. To prevent a password prompt you need to add a private/public key relation between icinga2 and the nas. Create a ssh key on icinga2 with your nagios account and add that public key to the authorized hosts on your nas system.

I really appreciate any feedback so feel free to test it 🙂

Deploy Dash with Apache2

Ever wondered how you can deploy Dash(Plotly) on an Apache2 Server? With this article i want to guide you through this journey. As many others, Apache2 is a Webserver where you can publish your own websites and so your dash-app. Dash is a framework to create beautiful dashboards in python. By following the link below you can see a bunch of projects where dash has been used.

https://dash-gallery.plotly.host/Portal/

Dash is coming with a tiny webserver itself. This webserver is for development only. Due to security i cannot recommend using it for production and so does the dash developer. During development i use virtualenv to isolate the environment and use different dash and python version apart from the regular server. Once i have finished development and started deploying my app, i copied that folder to /var/www/html/ and with it the virtual environment.

cp -p /<path>/Dash /var/www/html/Dash

For apache2 you need to install some requirements to make dash proper working. This differs from your python version. For python3 install libapache2-mod-wsgi-py3

sudo apt-get install libapache2-mod-wsgi-py3

See this link, if you don’t know what wsgi exactly is: http://wsgi.tutorial.codepoint.net/
In short wsgi is an interface specification by which server and application communicate. I put my wsgi file in /var/www/html/Dash/wsgi.py.

#cat wsgi.py
import sys
sys.path.insert(0,"/var/www/html/Dash/")
from app import server as application

Please note that app in “from app import server as application” is my file name. You might have a different name with your dash-code.

Configure Apache2

Further we need to modify our Apache2 configuration. There are several ways to deploy dash with Apache2. I like to use a different Port for my app. For now Apache2 is listening on Port 80/443 only. We need to add another Port like 8050. Amend ports.conf in /etc/apache2/ and add a second “Listen” line like below.

#cat ports.conf
# If you just change the port or add more ports here, you will likely also
# have to change the VirtualHost statement in
# /etc/apache2/sites-enabled/000-default.conf

Listen 80
Listen 8050

[...]

Once done we can create a new site on Apache2. Create a new file within /etc/apache/sites-available/. I named mine dash.conf but this is up to you.

#user@server:/etc/apache2/sites-available# cat dash.conf
<VirtualHost *:8050>
        ServerAdmin webmaster@localhost
        DocumentRoot /var/www/html/Dash

        ErrorLog ${APACHE_LOG_DIR}/error.log
        CustomLog ${APACHE_LOG_DIR}/access.log combined

        WSGIDaemonProcess Dash threads=5 user=www-data group=www-data python-path=/var/www/html/Dash python-home=/var/www/html/Dash/bin
        WSGIScriptAlias / /var/www/html/Dash/wsgi.py

        <Directory /var/www/html/Dash>
                <Files wsgi.py>
                        #Require all granted 
                        AuthType Basic #required for Authentication
                        AuthName <name> #required for Authentication
                        AuthUserFile "/<path>/.htusers" #required for Authentication
                        Require valid-user #required for Authentication
                </Files>
                WSGIProcessGroup Dash
                WSGIApplicationGroup %{GLOBAL}
                Order deny,allow
                Allow from all
        </Directory>

</VirtualHost>

*Please take into account that this file already contains the code for the Authentication in the next section.

WSGIDaemonProcess is running with user/group www-data, which usually is the group apache2 does work with. This is required to isolate apache2, mainly for security purpose.
Additionally we need to enable that site, so it gets recognized by Apache2

a2ensite dash

a2ensite will create a symlink in sites-enable to our configuration in sites-available.

As our WSGIProcess does run with www-data rights we have to give that group permission to access our dash folder with the correct privileges. Owner(root) does have full access while group(www-data) can read and execute. Others don’t have any permission for security reasons.

ls -ltr /var/www/html/
drwxr-x--- 9 root www-data  4096 Sep 28 15:28 Dash

You have to use command chmod respective chown to grant access to a folder/file. I had to do it as defined below, but it might differ in your case. “-R” stands for recursive execution.

chown -R :www-data Dash/
chmod -R o-rw Dash/

If you are not familiar with chown/chmod command read this post: https://www.unixtutorial.org/difference-between-chmod-and-chown/#:~:text=The%20chmod%20command%20stands%20for,a%20user%20and%20a%20group.

Dash Configuration

If you have come thus far, adapt your code and add “server = app.server”.

server = app.server
if __name__ == '__main__':
    app.run_server(debug=True,host='0.0.0.0',port='8050')

Last but not least you have to release the port in your firewall. Iptables and ufw are the most common ones. In case you use Iptables execute following command in your shell.

iptables -I INPUT 3 -p tcp --dport 8050 -j ACCEPT

Everyone should be allowed to access your page now. Of course you can restrict it way more with IPtables-rules, I leave it to you. This is the simplest way publishing your site.

Secure your app with Basic Authentication

By default dash provides Basic authentication within the python code, but for some reason it does not work for me. The authentication screen prompts and i can enter my username/password but apache/dash won’t let me in. So i decided to create my own authentication by using htpasswd.

htpasswd -c -B <filename(ie. .htusers)> <username>

While executing it will ask for a password for this user. As soon as it has finished you can see your file. Link that one to your dash.conf, which was mentioned above.

That’s it. You finally set your apache2 up to run dash-apps. In my next article i am going to write about my dash-app and what it does.

Happy Coding so far 🙂